
Home surveillance cameras have become increasingly popular, offering homeowners a sense of security and peace of mind. From basic indoor models to sophisticated outdoor systems with advanced features, the options available can seem overwhelming. This guide explores the various types of cameras, their functionalities, installation processes, privacy concerns, and integration with smart home ecosystems, helping you make an informed decision for your home security needs.
We’ll delve into the differences between wired and wireless systems, examining the pros and cons of each. We’ll also cover crucial features like night vision, motion detection, and cloud storage, along with considerations for data privacy and security. Finally, we’ll discuss the cost implications and offer practical tips for troubleshooting common issues.
Types of Home Surveillance Cameras
Choosing the right home surveillance camera can significantly enhance your security and peace of mind. Understanding the various types available and their specific features is crucial for making an informed decision. This section will explore the different options, helping you determine which best suits your needs and budget.
Wired vs. Wireless Home Security Cameras
The fundamental choice when selecting a home security camera often comes down to wired versus wireless connectivity. Wired cameras offer a more stable and reliable connection, while wireless cameras provide greater flexibility in placement.
Wired Cameras: Advantages and Disadvantages
Advantages: Wired cameras boast a consistently strong and uninterrupted connection, eliminating the risk of dropped signals or interference. They are generally considered more secure, as they are less susceptible to hacking attempts compared to their wireless counterparts. They also often offer higher video quality and more advanced features due to their reliable power source.
Disadvantages: The most significant drawback of wired cameras is their limited placement flexibility. Installation requires running cables, which can be inconvenient and potentially unsightly. They also lack the portability of wireless cameras.
Wireless Cameras: Advantages and Disadvantages
Home surveillance cameras offer peace of mind, but managing all that footage can be a challenge. A good system involves keeping things organized, and that extends beyond just digital files; think about where you store your hard drives and other equipment. For clever storage solutions, check out these cabinet organization ideas to keep your tech clutter under control.
Then, you can focus on what really matters: your home’s security.
Advantages: Wireless cameras offer unparalleled placement flexibility. They can be positioned virtually anywhere within the range of your Wi-Fi network, making them ideal for various locations and scenarios. Their portability allows for easy relocation if needed.
Disadvantages: Wireless cameras rely on a stable Wi-Fi connection, which can be susceptible to interference and signal drops. This can lead to connectivity issues and potential recording gaps. They can also be more vulnerable to hacking if not properly secured.
Types of Home Surveillance Cameras by Application
Home surveillance cameras are designed for various applications, each with its own set of features and functionalities.
Indoor Cameras: Designed for indoor use, these cameras often prioritize image quality and features like night vision and motion detection. They are typically smaller and less weather-resistant than outdoor cameras.
Outdoor Cameras: Built to withstand the elements, outdoor cameras are weatherproof and durable. They often include features like infrared night vision, motion detection, and tamper-resistant housings.
Doorbell Cameras: Combining video surveillance with a doorbell, these cameras allow you to see and speak to visitors remotely, even when you’re not home. They often include motion detection and recording capabilities.
PTZ (Pan, Tilt, Zoom) Cameras: Offering advanced control, PTZ cameras allow you to remotely adjust the camera’s viewing angle, pan left and right, tilt up and down, and zoom in for a closer view. This provides comprehensive coverage of a larger area.
Comparison of Popular Home Surveillance Camera Brands
The following table compares five popular brands of home surveillance cameras based on features, price range, and user reviews (Note: Prices and reviews are approximate and can vary based on the specific model and retailer).
| Brand | Features | Price Range (USD) | User Reviews (Summary) |
|---|---|---|---|
| Arlo | Wireless, battery-powered, cloud storage, motion detection, night vision | $100 – $300+ | Generally positive, praised for ease of use and wireless flexibility; some complaints about subscription costs for cloud storage. |
| Ring | Wireless, doorbell cameras, motion detection, cloud storage, two-way audio | $60 – $250+ | Popular choice, strong user base; some concerns about privacy and subscription fees. |
| Nest | Wireless, indoor/outdoor options, cloud storage, intelligent features (person detection), integration with other smart home devices | $150 – $350+ | High-quality cameras with robust features; some users find the interface complex and the subscription costs significant. |
| Eufy | Wireless, local storage (no subscription needed), motion detection, good battery life | $80 – $200+ | Positive reviews for local storage and value; some users report occasional connectivity issues. |
| Blink | Wireless, battery-powered, cloud storage (limited free plan), motion detection, night vision | $30 – $150+ | Affordable option; some users report shorter battery life compared to other brands. |
Features and Functionality
Choosing a home surveillance system involves understanding the key features that impact its effectiveness and overall value. Different features cater to various security needs and budgets, so careful consideration is crucial. This section will explore some of the most important features and their impact on your home security setup.
Several features significantly enhance the capabilities of home surveillance cameras, influencing both their cost and their effectiveness in protecting your property. Understanding these features and their trade-offs is essential for making an informed decision.
Night Vision
Night vision is a crucial feature for any home surveillance system, especially for areas that experience darkness, like driveways or backyards. Infrared (IR) LEDs are commonly used to illuminate the scene in low-light conditions, allowing the camera to capture clear images even at night. The quality of night vision varies depending on the camera’s sensor and the number of IR LEDs.
Higher-end cameras often provide better clarity and range in low-light environments. Without night vision, a significant portion of the day’s activity might be missed, rendering the camera less effective.
Motion Detection
Motion detection is a feature that triggers recording or alerts only when movement is detected within the camera’s field of view. This significantly reduces the amount of storage space needed and allows for quicker review of relevant footage. Many systems offer customizable motion detection zones, allowing users to focus on specific areas of interest, reducing false alarms triggered by things like swaying trees or passing animals.
The sensitivity of motion detection can also be adjusted, balancing the need for sensitivity with the risk of false alarms. A system without motion detection would constantly record, quickly filling up storage and making reviewing footage a time-consuming task.
Two-Way Audio
Two-way audio enables communication between the camera and a smartphone or other connected device. This feature is particularly useful for deterring intruders or communicating with delivery personnel. It allows you to listen in on what’s happening and, in some cases, speak to whoever is in front of the camera. While not essential for security, two-way audio adds a layer of interaction and can be a valuable tool in various situations.
Cameras lacking this feature are limited to passive observation.
Home surveillance cameras offer peace of mind, keeping an eye on things while you’re away. For a stylish and discreet way to store your recording equipment, consider the clean lines and functionality of Scandinavian cabinets ; their minimalist design blends seamlessly with most home aesthetics. This way, your security system remains effective without compromising your home’s overall look.
Cloud Storage vs. Local Storage
The decision between cloud storage and local storage for recorded footage involves weighing several factors. Cloud storage offers accessibility from anywhere with an internet connection and often includes features like backup and redundancy. However, it requires a subscription fee and relies on a stable internet connection. Local storage, usually via an SD card or Network Video Recorder (NVR), eliminates subscription costs and provides immediate access to footage, even during an internet outage.
However, it requires regular manual backup to prevent data loss and lacks the remote accessibility of cloud storage.
| Feature | Cost Impact | Effectiveness Impact |
|---|---|---|
| Night Vision | Increases cost (more advanced sensors and IR LEDs) | Significantly increases effectiveness, especially in low-light conditions |
| Motion Detection | Moderately increases cost (more sophisticated processing) | Significantly increases effectiveness by reducing storage needs and focusing on relevant events |
| Two-Way Audio | Moderately increases cost (additional microphone and speaker components) | Increases effectiveness by enabling interaction and deterrence |
| Cloud Storage | Adds recurring subscription cost | Increases effectiveness through remote accessibility and backup, but depends on internet connectivity |
| Local Storage | Lower initial cost, but may require additional hardware (NVR or large SD card) | Provides immediate access to footage even without internet, but requires manual backups |
Installation and Setup
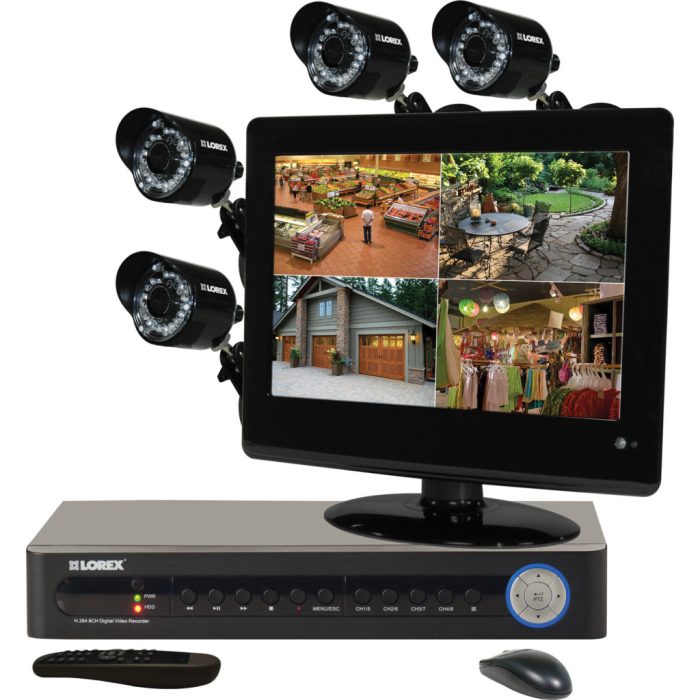
Source: phoneall.net
Setting up your home surveillance system might seem daunting, but with a little patience and these instructions, you’ll have your cameras up and running in no time. This section covers the typical installation process for a wireless system, best practices for placement, and how to configure essential features like motion detection.Installing a wireless home surveillance camera system is generally straightforward.
The process typically involves downloading a mobile app, connecting the camera to your Wi-Fi network, and positioning the cameras strategically. The specific steps may vary depending on the brand and model, but the overall principles remain the same.
Wireless Camera System Installation Steps
Before beginning, ensure you have all necessary components: cameras, power adapters (if not battery-powered), mounting hardware, and your smartphone or tablet with the manufacturer’s app installed.
- Download and Install the App: Download the manufacturer’s mobile application from your device’s app store (Google Play or Apple App Store). This app will guide you through the rest of the setup process.
- Connect the Camera to Power: Plug in your camera’s power adapter if it’s not battery-powered. Allow sufficient time for the camera to fully power up.
- Add the Camera to the App: Open the app and follow the on-screen instructions to add a new camera. This usually involves scanning a QR code located on the camera or entering a camera ID.
- Connect to Your Wi-Fi Network: The app will prompt you to connect the camera to your home’s Wi-Fi network. You’ll likely need to enter your Wi-Fi password.
- Camera Placement and Mounting: Once connected, you can begin positioning the camera. Refer to the next section for best practices on camera placement.
- Test the Camera: After mounting, test the camera’s functionality by viewing the live feed through the app. Check for clear image quality and proper functionality.
Camera Placement Best Practices
Proper camera placement is crucial for effective surveillance. Poor placement can lead to blind spots and ineffective monitoring. Consider these factors:
- Coverage Area: Position cameras to cover key areas like entrances, windows, and walkways. Overlap coverage slightly between cameras to eliminate blind spots.
- Angle and Height: Mount cameras at an optimal height and angle to capture the desired view. Experiment with different angles to find the best perspective.
- Obstructions: Avoid placing cameras where they might be obstructed by plants, furniture, or other objects. Ensure a clear line of sight.
- Lighting Conditions: Consider lighting conditions. Cameras with night vision capabilities are ideal for areas with low light.
- Weather Protection: If placing cameras outdoors, ensure they are weatherproof and protected from the elements.
Motion Detection Zone Configuration and Alert Setup
Motion detection zones allow you to customize the areas where the camera triggers alerts. Setting up alerts effectively helps you stay informed about activity in specific areas.Configuring motion detection involves defining specific areas within the camera’s field of view that will trigger alerts. This is usually done within the mobile app’s settings. You can draw custom zones or use pre-set shapes to define the areas that will trigger alerts.
Consider placing zones around entrances and other high-traffic areas. You can adjust the sensitivity of motion detection to reduce false alarms caused by things like swaying trees or pets.Alert settings typically allow you to choose how you’re notified when motion is detected. Common options include push notifications to your smartphone, email alerts, or recording to a cloud storage service or local storage (SD card).
You can also adjust the frequency of alerts and customize the alert message. For example, you might choose to receive an alert only if motion is detected for a certain duration, preventing false alerts from short bursts of movement.
Data Privacy and Security: Home Surveillance Cameras
Home surveillance cameras offer peace of mind, but they also raise important questions about data privacy and security. The constant recording of video and audio within your home presents potential risks if not handled correctly. Understanding these risks and implementing appropriate security measures is crucial to protecting your privacy and the security of your data.Protecting your privacy when using home surveillance cameras involves understanding both the potential vulnerabilities and the safeguards available.
Many cameras store footage on cloud servers, raising concerns about data access and potential breaches. Similarly, the cameras themselves can be vulnerable to hacking, potentially allowing unauthorized access to your home’s video feed and even control of the device itself. Manufacturers are increasingly aware of these concerns and are implementing various security features to mitigate these risks.
Camera Manufacturer Security Measures
Different manufacturers employ various security measures to protect user data. These typically include data encryption during transmission and storage, secure authentication protocols to prevent unauthorized access, and regular software updates to patch security vulnerabilities. For example, some manufacturers use end-to-end encryption, meaning only the user can decrypt and view their recorded footage. Others utilize two-factor authentication, requiring both a password and a secondary verification method (like a code sent to a phone) to access the camera’s settings and footage.
Regular software updates are essential for addressing newly discovered security flaws and improving the overall security posture of the system.
Best Practices for Securing Your Home Surveillance Camera System
Implementing strong security practices is essential to minimizing privacy risks. This involves a multi-layered approach, combining technical and operational safeguards.
- Choose a reputable camera manufacturer with a strong track record in security. Research the manufacturer’s security protocols and privacy policies before purchasing a camera.
- Change the default password immediately upon installation. Use a strong, unique password that is not used for any other accounts.
- Enable two-factor authentication whenever available. This adds an extra layer of security, making it much harder for unauthorized individuals to access your camera.
- Keep your camera’s firmware updated. Regular updates often include security patches that address known vulnerabilities.
- Use strong and unique Wi-Fi passwords for your home network. A weak network password can make your camera vulnerable to hacking.
- Review your camera’s privacy settings and adjust them to your comfort level. This might involve disabling features you don’t need, such as motion detection alerts or cloud storage.
- Regularly review recorded footage and delete any unnecessary recordings to minimize the amount of sensitive data stored.
- Consider using a VPN to encrypt your internet traffic, adding an extra layer of security if you’re accessing your camera remotely.
- Physically secure your cameras to prevent tampering or theft. This could involve mounting them securely and using tamper-evident seals.
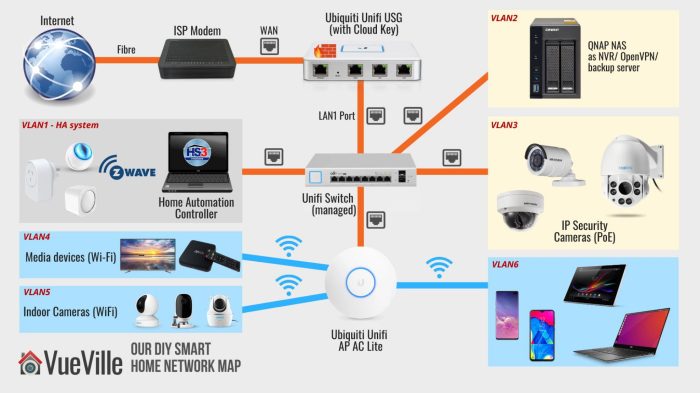
Integration with Smart Home Systems

Source: richcontext.com
Home surveillance cameras are no longer isolated devices; they seamlessly integrate with a growing number of smart home systems, enhancing both security and convenience. This integration allows for centralized control, automation, and a more holistic approach to home management. The ability to connect your security cameras to other smart devices offers a significant upgrade to your home’s overall security and functionality.Integrating your security cameras with your smart home ecosystem provides a unified platform for managing all your connected devices.
This centralized management simplifies control and monitoring, offering a more streamlined user experience. For instance, you might receive alerts on your smartphone when a camera detects motion, alongside notifications from your smart door lock or smoke detector. This consolidated approach improves response times and enhances situational awareness.
Google Home Integration
Integrating a home surveillance camera with Google Home is relatively straightforward. Many security cameras are designed with Google Assistant compatibility. This allows users to control the camera through voice commands, view live feeds on a Google Nest Hub, and incorporate the camera’s feeds into Google Home’s overall smart home view. The process typically involves downloading the camera’s companion app, creating an account, and linking the account to your Google Home app.
Once linked, you can use voice commands like “Hey Google, show me the living room camera” to view the live feed. The specific steps may vary slightly depending on the camera brand and model. For example, some cameras might require you to enable specific Google Assistant features within the camera’s settings.
Amazon Alexa Integration
Similar to Google Home, Amazon Alexa offers extensive compatibility with home surveillance cameras. Many security cameras are compatible with Alexa, allowing users to view live camera feeds on Echo Show devices, receive alerts through Alexa notifications, and control camera functions via voice commands. The integration process generally involves linking your camera’s app to your Amazon Alexa app. Once connected, you can use voice commands such as “Alexa, show me the front door camera” to access live feeds.
The precise steps may differ depending on the camera brand and model, but generally involve enabling Alexa skills within the camera’s app settings. This integration creates a hands-free, voice-controlled security system, improving accessibility and convenience.
Cost and Budget Considerations
Source: vueville.com
Home surveillance cameras offer peace of mind, keeping an eye on things while you’re away. But what about when you’re home? Many people are now integrating their home security systems with other smart home tech, such as Home fitness technology , allowing them to monitor their workouts alongside their property. This way, your security cameras can also keep an eye on your home gym equipment, providing an added layer of security and awareness.
Setting up a home surveillance system can range from a relatively inexpensive DIY project to a significant investment depending on your needs and desired features. Understanding the various cost factors involved is crucial for budgeting effectively and choosing a system that fits your financial capabilities. This section will break down the costs associated with different types of home surveillance systems, helping you make an informed decision.Choosing a home surveillance system involves considering various costs beyond the initial purchase price.
These include the cost of the hardware itself (cameras, DVR/NVR, and other accessories), software licenses (if applicable), and ongoing monthly subscription fees for cloud storage or advanced features. The total cost is heavily influenced by the number of cameras, their features (such as resolution, night vision, and weatherproofing), the type of storage (local or cloud), and the level of smart home integration desired.
Cost Comparison of Different Home Surveillance Systems
The cost of home surveillance systems varies greatly depending on the type of system chosen. A basic system with a single, inexpensive wired camera might cost around $50-$100, including the camera and necessary cabling. Adding more cameras and features quickly increases the cost. A more advanced system with multiple wireless cameras, a sophisticated NVR, and cloud storage could easily cost $500-$1000 or more upfront.
Home surveillance cameras offer peace of mind, especially when you’re away. Improving your home’s aesthetics can also deter potential intruders, and a great way to do that is by sprucing up your kitchen with a fresh coat of paint – check out these helpful Cabinet painting tips for a stunning upgrade. Ultimately, a combination of security measures and a well-maintained home provides the best protection.
Subscription fees for cloud storage and advanced features can add another $5-$30 per month, depending on the provider and storage capacity. For example, a system with four high-resolution cameras, a powerful NVR, and a cloud storage plan could cost upwards of $1500 initially, plus a monthly subscription fee.
Factors Influencing the Overall Cost
Several factors significantly impact the total cost of a home surveillance system. The number of cameras is a primary driver, as each camera adds to the initial hardware cost. Higher-resolution cameras (e.g., 4K) are more expensive than lower-resolution ones (e.g., 720p). Features such as night vision, motion detection, two-way audio, and weatherproofing also increase the price. The choice between local storage (using a hard drive in an NVR) and cloud storage influences the cost; cloud storage usually involves ongoing monthly subscription fees, while local storage requires an initial investment in a hard drive with sufficient capacity.
Finally, smart home integration capabilities, such as compatibility with smart assistants and other smart devices, often come at an additional cost.
Cost-Saving Strategies, Home surveillance cameras
Planning ahead can help you significantly reduce the overall cost of your home surveillance system.
- Start small and expand later: Begin with a basic system with one or two cameras and gradually add more as your budget allows.
- Choose a system with local storage: While cloud storage offers convenience, it comes with recurring fees. Local storage eliminates these fees but requires you to manage your own storage.
- Opt for wired cameras when possible: Wired cameras are generally cheaper and more reliable than wireless cameras, but require more installation effort.
- Consider purchasing used or refurbished equipment: This can save a significant amount of money, but be sure to check the condition and warranty carefully.
- DIY installation: While professional installation offers convenience, doing it yourself can save on labor costs. However, ensure you have the necessary skills and knowledge before attempting this.
- Compare prices from different vendors: Don’t settle for the first price you see. Shop around to find the best deals on cameras, NVRs, and other equipment.
Troubleshooting Common Issues
Home surveillance systems, while generally reliable, can sometimes present challenges. Understanding common problems and their solutions can save you time and frustration, ensuring your system operates smoothly and provides the security you need. This section will cover some frequently encountered issues and offer practical solutions.
Connectivity Issues
Connectivity problems are a common hurdle. These issues can range from the camera failing to connect to your Wi-Fi network to intermittent drops in connection, resulting in lost footage or inaccessible live feeds. Several factors can contribute to these problems, including weak Wi-Fi signals, incorrect network settings, and router limitations.
Troubleshooting Steps:
- Check Wi-Fi Signal Strength: Ensure your camera is within range of a strong Wi-Fi signal. Physical obstructions like walls or large appliances can significantly weaken the signal. Consider using a Wi-Fi extender if necessary.
- Verify Network Settings: Double-check that the camera is correctly connected to your Wi-Fi network. Incorrectly entered passwords or network names are frequent causes of connection failures. Consult your camera’s manual for instructions on connecting to your Wi-Fi network.
- Restart Your Router and Camera: A simple power cycle can often resolve temporary glitches. Unplug both your router and the surveillance camera, wait for about 30 seconds, and then plug them back in.
- Check for Network Interference: Other devices operating on the 2.4 GHz frequency band (the most common for home Wi-Fi) can sometimes interfere with your camera’s connection. Try changing your Wi-Fi channel if you suspect interference.
- Update Firmware: Outdated firmware can sometimes cause connectivity problems. Check for and install any available firmware updates through your camera’s app or manufacturer’s website.
Poor Video Quality
Blurry, pixelated, or otherwise poor video quality can significantly reduce the effectiveness of your home surveillance system. Several factors can contribute to this issue.
Causes and Solutions:
- Low Resolution Settings: Check your camera’s settings to ensure it’s recording at the highest resolution it supports. Lower resolutions save storage space but compromise image quality.
- Insufficient Lighting: Poor lighting conditions can lead to grainy video. Consider adding additional lighting in areas with low light levels, or using a camera with night vision capabilities.
- Lens Issues: A dirty or smudged camera lens can significantly impact video quality. Regularly clean the lens with a soft, microfiber cloth.
- Network Bandwidth Issues: If you’re streaming high-resolution video over a slow or congested network, the quality might suffer. Prioritize bandwidth allocation for your surveillance cameras if necessary.
- Camera Placement: The camera’s position can affect image quality. Avoid placing the camera in areas with excessive backlighting or direct sunlight, which can cause overexposure and wash out details.
Malfunctioning Motion Detection
Motion detection is a crucial feature of home surveillance cameras, but it can sometimes trigger false alarms or fail to detect actual motion.
Troubleshooting Motion Detection:
- Adjust Sensitivity Settings: Motion detection sensitivity can be adjusted in your camera’s settings. Too high a sensitivity can lead to false alarms triggered by swaying trees or passing animals; too low a sensitivity might miss actual events.
- Camera Placement and Obstructions: Ensure the camera’s view isn’t obstructed by objects that might trigger false alarms or block the detection of actual motion. Consider repositioning the camera for optimal performance.
- Environmental Factors: Strong winds, rain, or other weather conditions can affect motion detection. Consider using a camera with weatherproofing features if you’re installing it outdoors.
- Background Movement: If there’s significant background movement in the camera’s field of view, it can interfere with accurate motion detection. Try to minimize background movement where possible.
App Connectivity and Firmware Updates
Problems with the mobile app used to manage your cameras or difficulties updating firmware are common.
Resolving App and Firmware Issues:
- Check App Permissions: Ensure your surveillance app has the necessary permissions to access your device’s network and storage.
- App Version Compatibility: Make sure you are using the latest version of the app. Outdated apps may have compatibility issues with newer camera firmware.
- Restart Your Phone and Camera: A simple restart can often resolve temporary software glitches.
- Check Your Internet Connection: A stable internet connection is crucial for app connectivity and firmware updates.
- Reinstall the App: If all else fails, uninstall and reinstall the app. This can often resolve corrupted app data.
Common Problems, Causes, and Solutions
| Problem | Possible Cause | Solution |
|---|---|---|
| Camera won’t connect to Wi-Fi | Incorrect password, weak signal, network interference | Check password, move closer to router, change Wi-Fi channel |
| Poor video quality | Low resolution, low light, dirty lens | Increase resolution, add lighting, clean lens |
| False motion alerts | High sensitivity, obstructions in view | Lower sensitivity, reposition camera |
| App connection issues | Outdated app, network problems | Update app, check internet connection |
| Firmware update failure | Poor internet connection, insufficient storage | Ensure strong internet, check storage space |
Legal and Ethical Considerations
Home surveillance cameras offer significant security benefits, but their use raises important legal and ethical questions. Understanding these aspects is crucial to responsible and lawful deployment of these systems. Failure to do so can lead to legal repercussions and damage personal relationships.Home surveillance cameras, while useful for security, are subject to various laws and ethical considerations. Improper use can lead to legal issues and social conflicts.
It’s vital to understand your rights and responsibilities before installing and using these systems.
Legal Implications of Recording and Sharing Footage
Laws regarding surveillance vary significantly by location. Many jurisdictions have statutes addressing recording individuals without their consent, particularly in areas with a reasonable expectation of privacy, such as bathrooms or bedrooms. Public spaces generally have less stringent restrictions, though the recording of identifiable individuals might still be subject to certain limitations. Before installing a camera, it’s recommended to consult local ordinances and state laws to ensure compliance.
Home surveillance cameras have become increasingly sophisticated, offering features like motion detection and remote viewing. This advancement is largely due to the integration of AI-powered home technology , which allows for smarter analysis of footage and improved security. For example, AI can differentiate between a pet and an intruder, reducing false alarms and making home surveillance cameras even more effective.
Sharing recorded footage without consent, even in seemingly innocuous situations, can also have legal consequences, potentially leading to lawsuits for invasion of privacy or defamation. For example, recording a neighbor’s property without their knowledge and subsequently sharing that footage online could lead to significant legal trouble. Similarly, sharing footage that misrepresents events or damages someone’s reputation could result in legal action.
Ethical Considerations Regarding Privacy
Beyond the legal aspects, ethical considerations are paramount. Respecting the privacy of neighbors, guests, and even passersby is crucial. Cameras should be positioned to avoid unnecessarily capturing images of individuals who haven’t consented to being recorded. Consider using privacy zones in camera settings to obscure areas where privacy is particularly important. Open communication with neighbors about your surveillance system can help build trust and avoid misunderstandings.
For instance, placing a visible sign indicating the presence of cameras can act as a deterrent and also inform people of their being recorded. Transparency about the purpose of the surveillance system also contributes to ethical usage.
Best Practices for Responsible Surveillance
Responsible use of home surveillance systems requires a proactive approach to privacy and legal compliance. Clearly define the purpose of your surveillance system. Only record what is necessary for security purposes. Store recordings securely and for a limited time, adhering to data retention policies. Regularly review and update your privacy policies.
Inform individuals who are regularly recorded. Provide clear signage indicating surveillance. Comply with all applicable local laws and regulations. Consider obtaining legal counsel if you have any doubts about the legality of your surveillance practices. Regularly review your camera footage and delete unnecessary recordings.
Final Review
Choosing the right home surveillance system depends on your specific needs and budget. By understanding the various types of cameras, their features, and the importance of data privacy and security, you can create a robust and reliable security system for your home. Remember to consider factors like camera placement, motion detection zones, and integration with your existing smart home setup.
With careful planning and implementation, you can enjoy the benefits of enhanced home security while mitigating potential risks.
FAQ Summary
What is the best resolution for home security cameras?
1080p (Full HD) is generally considered a good balance between image quality and storage space. Higher resolutions like 4K offer superior detail but require more storage.
How much storage do I need for home security camera footage?
This depends on the number of cameras, recording resolution, and length of recording. Cloud storage offers convenience but comes with subscription fees. Local storage (like an SD card or NAS) is cheaper but requires more management.
Can home security cameras work without internet?
Some wired systems can record locally without internet access, but many wireless cameras rely on an internet connection for remote viewing and cloud storage. Consider a system with local storage if internet connectivity is unreliable.
Are home security cameras weatherproof?
Not all cameras are weatherproof. If you need outdoor cameras, specifically look for those with an IP65 or higher weather rating to ensure they can withstand rain, snow, and extreme temperatures.
How do I deal with false motion alerts?
Adjust the motion detection sensitivity in your camera settings. You can also define specific motion detection zones to minimize alerts from areas with frequent movement (like busy streets).


